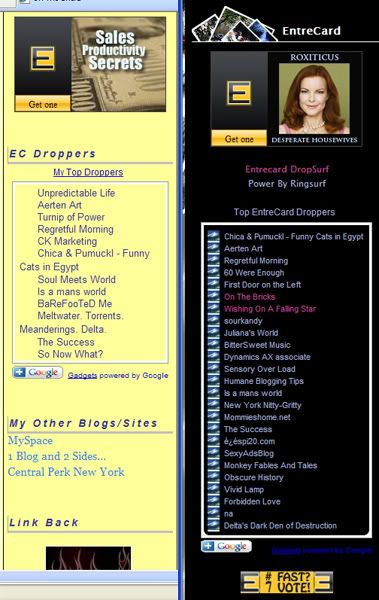
Adding an EntreCard top dropper widget to your sidebar is very easy. Follow these steps, and if you have any issues at all, please feel free to leave a comment with your question and I'll get back to you at my earliest convenience.
STEPS TO ADDING THE TOP DROPPERS WIDGET TO YOUR SIDEBAR
1. Visit Google Gadgets to find all kinds of cool gadgets to add to your blog or website. Use sparingly, however, too many gadgets and you end up with clutter. You can browse on your own, or go to Step 2. for a direct link to the RSS Google Gadget.
2. Custom RSS.
3. Click the Button that is labeled: "Add to your Webpage".
4. You will end up at This Page, which allows you to customize the gadget by altering the title, the height, the width, the number of entries to show from your RSS Feed, and just about every CSS element imaginable so that you can match your EntreCard Widget colors to your blog or webpage. You'll need to spend some time here playing around with the options to get it right. Fortunately, you are able to preview the changes by clicking on the button at the bottom of your screen that says "Preview Changes".
5. Configuring your RSS Feed. The one thing that you absolutely must do to get the feed for your EntreCard Droppers is Customize this field in the Google widget. This is the "FEED URL", or the first field in the right hand column. Filling in the Feed URL for your EntreCard Top Droppers is easy. Follow these steps:
A. Go to your EntreCard Dashboard.
B. Click on Statistics.
C. Next to the first box showing your top droppers, click on the RSS Feed icon to the right of the box.
D. The URL displayed in your browser at the top of your screen when you are seeing all 25 of your Top EntreCard Droppers on one page is your RSS Feed.
E. Copy and Paste the URL in your browser into the "FEED URL" box of the configuration screen of your google widget.
6. After you have previewed your changes, and everything is set the exact way that you want it, go ahead and click the button at the bottom: "Get Code".
7. Simply Copy the Code and paste it where you want your Top Droppers Widget to appear on your sidebar. I recommend placing it directly underneath your EntreCard Widget.
That's all there is to it, again, if you need any help, feel free to leave a comment and I'll get back with you as soon as I can.
Thanks for reading.
Technorati Tags: entrecard, entrecard widgets, rss feeds, google custom rss widgets, blogging, blogging tools, bloggers
Generated By Technorati Tag Generator


17 comments:
thanks a lot for this. I have been wondering how everyone has been doing this, I can't wait to give it a try.
I did it!! Yayyyyyy.......I did it!!! And I am definitely technically challenged!!
Thank you so very very much!!
Happy day:-))))
Hi Matt, I really like this widget but it doesn't link the Top Droppers to their respective sites right?
Hi Matt!
I saw it over at Jackie's blog and thought that it was cool..so added one to my blog too..and was happy to see you were my number one top dropper.. thank you so so much!
I was thinking of writing up a tutorial for it too but here I am and here is the tutorial all laid out nice and neat for everyone.. super cool.. Thanks again Matt.
GP! It does link up.. you can set it such!
Wow thanks for the tip. I never new blogger has a new gadget like this already.
Matt, I see the link LOL! I'm going to try out this widget after all, thanks so much! :)
Excellent information and instructions. I'll be back when I have time to do this and upload it to my blog.
Thanks so much for stopping by and the lovely compliment on my site. :-D
Hi Matt, thank you for this widget. I installed it in my other blog.
Hi Matt! I got my widget up and am loving it! You are also one of my Top EC Droppers for Mariuca, thanks so much! :):):)
Thanks for all the little extra tips Matt.
I am visiting in Maine for the next three weeks. So working at my PC is difficult to say the least.
We have four grandsons and they keep us pretty busy.
I had it all changed today and was just going to update it on my page and my daughter handed me the baby.
So maybe tomorrow!!
Hope you are having a grand week end!!:-)))
I am definitely going to try this out. It will encourage more people to drop their cards.
Cheers.
thanks for sharing this. i cant wait to try it. :)
this has been very helpful! thanks a lot!
Thanks for the great instructions, I have been wanting to do this for a long time!
Cheers!
http://thehousethatkoenclairerebuilt.blogspot.com
Wonderful. Thank you for this terrific idea. I really appreciate it, and now have one of these at each my blogs.
Cheers, Thea
Hi there.. I was guided here by Mariuca and this tutorial was a godsend! It was really simple to follow (especially for someone who is so clueless when it comes to things like this) and I've managed to put it up already! Thanks alot! :D
Thanx a lot
Post a Comment